Thinking of shooting an interview for a documentary or short film project? Make your frame and lighting decisions beforehand.
How do you shoot an interview scene?
Shooting an interview scene involves careful planning and execution to capture a compelling and engaging conversation. Here’s a step-by-step guide on how to shoot an interview scene:
Pre-production:
- Preparation:
- Define the purpose of the interview: Determine what you want to achieve with the interview and the message you want to convey.
- Research the interviewee: Understand their background, expertise, and the topic of discussion. This will help you ask relevant questions.
- Develop a list of questions: Prepare a list of open-ended questions that encourage in-depth answers. Organize them logically to guide the conversation.
- Location scouting:
- Choose a suitable location: Select a quiet and well-lit location that complements the tone of the interview. Avoid distracting backgrounds or noise.
- Equipment:
- Camera and lens: Use a high-quality camera and lens for sharp and clear footage.
- Tripod: Stabilize the camera with a tripod to avoid shaky shots.
- Lighting: Ensure proper lighting, using natural light or professional lighting equipment, to avoid harsh shadows or underexposed subjects.
- Microphones: Use external microphones for clear audio. Lavaliere microphones or shotgun microphones are common choices for interviews.
- Headphones: Monitor audio quality using headphones to catch any issues during recording.
Production:
- Camera setup:
- Frame composition: Position the interviewee off-center, following the rule of thirds, and leave enough headroom above their head.
- Eye level: Keep the camera at the interviewee’s eye level for a natural and comfortable perspective.
- Lighting:
- Three-point lighting: Use key, fill, and backlighting to illuminate the subject evenly and create depth. Adjust the lighting to achieve a natural and flattering look.
- Audio setup:
- Mic placement: Attach microphones close to the interviewee, either on their lapel or on a stand just out of frame. This minimizes ambient noise.
- Camera settings:
- Choose the appropriate frame rate and resolution for your project.
- Set the white balance to match the lighting conditions.
- Adjust focus and exposure settings to maintain a sharp and well-exposed image.
- Interview process:
- Brief the interviewee: Explain the format, tone, and goals of the interview to the interviewee. Make them feel comfortable and at ease.
- Conduct a pre-interview: Before recording, have a casual conversation with the interviewee to help them relax and establish rapport.
- Record multiple takes: Shoot multiple takes to ensure you capture the best responses and avoid technical glitches.
Post-production:
- Footage organization:
- Review the footage and select the best takes for each question.
- Organize the footage in a logical order to tell a coherent story.
- Editing:
- Trim any mistakes, pauses, or irrelevant parts to keep the interview concise and engaging.
- Add cutaway shots: Incorporate relevant visuals or b-roll footage to enhance the interview’s visual appeal.
- Use transitions: Smoothly transition between different questions or topics.
- Audio enhancement:
- Clean up audio: Remove background noise, adjust volume levels, and enhance clarity if needed.
- Add music or ambient sound: Background music or subtle sound effects can enhance the mood and pacing of the interview.
- Graphics and text:
- Add lower-thirds: Include the interviewee’s name and title on screen.
- Overlay relevant graphics: Incorporate relevant images, charts, or text to support the interview content.
- Exporting and sharing:
- Export the final video in the desired format and resolution for the intended platform.
- Share the video on social media, websites, or other distribution channels.
Remember that each interview scene may have specific requirements based on the content and context, so adapt these steps to suit your project’s needs. The goal is to capture a compelling and informative conversation that engages your audience.
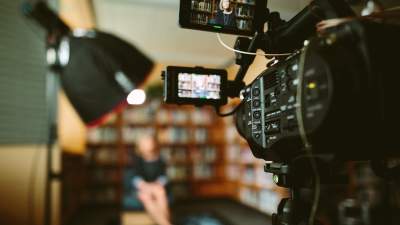
What is an Interview shot?
An interview shot refers to a specific type of camera shot used to capture a conversation between an interviewer and an interviewee. It is a fundamental technique used in filmmaking, television production, documentaries, and various other forms of media to visually present discussions, insights, and information shared during an interview.
In an interview shot, the camera focuses on one or more individuals engaged in a conversation. The setup is typically designed to emphasize the communication between the interviewer and interviewee while conveying the subject matter effectively to the audience.
Key characteristics of an interview shot include:
- Composition: The composition often follows the rule of thirds, positioning the subject slightly off-center to create a visually appealing frame. The subject’s eyes are usually positioned along the top horizontal line of the frame.
- Framing: The frame typically includes the upper half or three-quarters of the interviewee’s body, focusing on their face, expressions, and body language.
- Eye Contact: The interviewer and interviewee maintain eye contact with each other, enhancing the sense of direct interaction.
- Shot Types: There are various shot types that can be used in interview shots, including close-ups, medium shots, and wide shots, depending on the context and the desired visual emphasis.
- Background and Lighting: The background is often kept simple and unobtrusive to keep the focus on the conversation. Lighting is important to ensure that the subjects are well-lit and easily visible.
- Camera Angle: The camera is usually placed at eye level or slightly higher, providing a neutral and comfortable perspective for the audience.
- Audio: High-quality audio recording is essential for interview shots. External microphones, such as lavalier mics, are often used to capture clear and crisp dialogue.
Interview shots are commonly used in news broadcasts, talk shows, documentaries, corporate videos, and more. They help convey information, emotions, and personal experiences through the interaction between the interviewer and the interviewee. The effectiveness of an interview shot depends on factors like framing, camera movement, lighting, and the overall production quality, all of which contribute to the engagement and impact of the conversation.
Different Interview Styles
There are various styles of conducting interviews in documentary filmmaking. Each style has its own unique characteristics and can create different effects on the audience. Here are some commonly used interview styles:
- Standard: This is the traditional approach where the interviewee sits and looks just off-camera. It is a safe and straightforward style that allows for focused storytelling.
- Interrotron: Coined by acclaimed filmmaker Errol Morris, the interrotron style involves the interviewee looking directly into the camera lens. It creates a more intimate connection between the interviewee and the audience.
- Conversational: In this style, two people engage in a conversation about a particular topic. It feels natural and can be a powerful way to capture authentic moments and reactions.
- Host plus standard: This style combines a standard interview with a reverse angle of the host. It is commonly seen in news journalism or when the filmmaker decides to put themselves in the documentary.
Each interview style has its pros and cons, and the choice of style depends on the desired effect, the subject matter, and the overall vision of the documentary.
By understanding and utilizing different interview styles, documentary filmmakers can bring their stories to life and engage the audience on a deeper level.
What is the best angle to shoot an interview?
The best angle to shoot an interview depends on several factors, including the context of the interview, the desired visual style, and the emotions you want to convey. Here are some common angles to consider when shooting an interview:
- Eye-Level Angle:
- This is the most common and natural angle for interviews. The camera is positioned at the eye level of the interviewee, creating a sense of equality and connection between the subject and the viewer.
- It maintains a neutral and comfortable perspective, making the audience feel like they’re part of the conversation.
- Low Angle:
- Shooting from a slightly lower angle can create a sense of authority or importance for the interviewee. It can make them appear larger-than-life and in control of the conversation.
- This angle is often used to emphasize the interviewee’s expertise or stature.
- High Angle:
- A high angle shot looks down on the interviewee, potentially making them seem more vulnerable or submissive. This angle can be effective for eliciting empathy from the audience.
- It can also be used to show the interviewee within their environment, offering context.
- Dutch Angle (Tilted Angle):
- A dutch angle involves tilting the camera slightly, creating a dynamic and visually interesting shot. This angle can add tension or evoke a sense of unease.
- While it’s not commonly used for traditional interviews, it can be employed for stylized or dramatic purposes.
- Over-the-Shoulder Angle:
- This angle involves shooting over the interviewer’s shoulder, capturing the interviewee’s profile. It can create a sense of intimacy and allow the audience to see the reactions of both participants.
- It’s often used in conversational interviews to show the interaction between the two participants.
- Two-Shot or Split-Screen:
- This angle involves framing both the interviewer and interviewee within the same shot. It can visually emphasize the dialogue and the dynamic between the two individuals.
- This angle is common in talk shows or debates where the interaction is a key element.
- Insert Shots or Cutaways:
- Insert shots or cutaways are not angles per se, but they are additional shots that can be interspersed throughout the interview. These shots can include close-ups of hands, facial expressions, or objects relevant to the conversation.
- They add visual variety and help break up the interview visually.
Ultimately, the choice of angle depends on the goals of the interview, the emotional tone you want to convey, and the overall style of the production. Experimenting with different angles during the shoot can provide you with a range of options to choose from during the editing process.
Why Shoot Interviews?
Shooting interviews is a crucial part of documentary filmmaking.
It allows filmmakers to capture the thoughts, emotions, and experiences of individuals who play a significant role in the subject matter.
The way interviews are conducted and filmed can greatly impact the overall narrative and storytelling of the documentary.
Interviews serve as a powerful tool for documentary filmmakers to gather information, provide context, and create a connection between the audience and the subject matter.
Through interviews, filmmakers can explore different perspectives, share personal stories, and convey the message they want to deliver.
How long does it take to shoot an interview?
The time it takes to shoot an interview can vary widely depending on several factors, including the complexity of the interview, the number of questions, the interviewee’s comfort level, technical setup, and the production’s overall schedule. Here are some considerations that can affect the duration of an interview shoot:
- Interview Length: The length of the interview itself plays a significant role. A short interview that only lasts a few minutes will naturally require less time to shoot than a longer, in-depth interview.
- Number of Takes: It’s common to shoot multiple takes to ensure you capture the best possible responses and angles. More takes might be necessary if there are technical issues, interruptions, or mistakes.
- Preparation Time: Setting up lighting, sound equipment, and camera angles can take time, especially if you’re working with a larger crew or more complex setups.
- Location and Setup: If the interview is taking place on location, the time required to set up and prepare the space can impact the overall shoot duration.
- Interviewee’s Comfort: Some interviewees might require more time to feel comfortable in front of the camera, especially if they are not used to being interviewed.
- Complexity of Questions: The complexity of the questions being asked might affect how long it takes for the interviewee to respond thoughtfully and thoroughly.
- B-Roll or Cutaways: If you’re incorporating cutaway shots or b-roll footage, this will add to the overall shoot time.
- Editing and Post-Production: Keep in mind that the actual interview shoot is only one part of the process. Editing, adding graphics, sound editing, and other post-production tasks also take time.
As a rough guideline, a relatively straightforward interview might take anywhere from 30 minutes to a couple of hours to shoot, including setup time.
However, more complex interviews or those with multiple takes could take longer.
It’s essential to plan ahead, allocate sufficient time, and communicate with your crew and interviewee to ensure a smooth shooting process.
Additionally, always be flexible and prepared for unexpected delays or changes, as they can impact the overall schedule.
Good planning and communication are key to a successful interview shoot.
Lighting an Interview
It is important to pay attention to lighting.
The subject should be looking towards the light source, typically the key light, to create a contrast between light and shadow. This adds depth and visual interest to the interview.
If there is a need for a second camera angle, it can be placed on the opposite side of the light source to capture the shadow side of the subject’s face.
Framing and Composition
In addition to the positioning and lighting, framing and composition play a crucial role in the standard interview style.
The camera should be set up at a slight angle to the subject, allowing for dynamic shots that capture different perspectives.
The use of a floating camera can add a cinematic touch to the interview.
Moving the camera from the subject’s hands to their face with a shallow depth of field creates a visually pleasing effect.
This technique can enhance the overall look and feel of the interview, making it more engaging for the audience.
Shooting an Interview: Examples
Mark Bone’s YouTube channel features a video about documentary interview styles, with every style and approach explained with examples.
Documentary Filmmaking
By paying attention to framing, lighting, and composition, filmmakers can create visually appealing and captivating interviews that effectively convey the story they want to tell.
Other documentary tips:
How do you shoot a 3 person interview?
Shooting a three-person interview involves additional considerations compared to a traditional two-person interview.
To effectively capture the conversation and interactions between three participants, here’s a guide on how to approach it:
Pre-production:
- Planning:
- Determine the roles: Identify who will be the primary interviewer and the roles of the other two participants (interviewees or co-interviewers).
- Prepare questions: Coordinate with the co-interviewers to create a list of questions that allow for a balanced distribution of speaking time.
- Location and Setup:
- Choose a suitable location: Ensure that the location can accommodate all three participants comfortably and provides enough space for the camera setup.
- Arrange seating: Position the participants in a way that allows them to maintain eye contact and interact naturally.
- Equipment:
- Cameras and angles: Consider using multiple cameras to capture different angles of the conversation. Wide shots, medium shots, and close-ups can provide visual variety.
- Microphones: Use multiple microphones to capture clear audio for all participants. Lavaliere microphones or shotgun microphones can be used depending on the setup.
Production:
- Camera Setup:
- Wide shots: Use wide shots to establish the context and show all three participants in the frame.
- Medium shots and close-ups: Switch between medium shots and close-ups to capture individual reactions and expressions during the conversation.
- Lighting:
- Ensure consistent lighting across all participants. Use a three-point lighting setup to ensure even illumination and avoid shadows.
- Audio Setup:
- Position microphones: Place microphones on each participant to ensure clear audio capture.
- Monitor audio: Use headphones to monitor audio quality throughout the interview.
- Camera Operation:
- Designate a camera operator for each camera if you’re using multiple cameras. This will ensure smooth transitions and proper framing.
Interview Process:
- Interaction Management:
- Establish a flow: Determine how participants will take turns speaking to avoid interruptions and ensure a coherent conversation.
- Non-verbal cues: Encourage participants to use non-verbal cues like nodding or looking at each other to signal when they want to speak.
- Moderation:
- Primary interviewer: The primary interviewer can lead the conversation, direct questions, and guide the overall discussion.
- Co-interviewers: Co-interviewers can supplement questions, provide context, and engage with the interviewees.
Post-production:
- Editing:
- Choose camera angles: Select the most suitable camera angles for each portion of the interview.
- Trim and organize: Edit the footage to create a coherent narrative, removing any irrelevant or redundant sections.
- B-roll and cutaways: Incorporate cutaway shots or b-roll footage to enhance visual engagement.
- Audio Mixing:
- Balance audio levels: Ensure that all participants’ audio is balanced and clear throughout the interview.
- Remove noise: Clean up audio and remove any background noise or interference.
- Graphics and Text:
- Lower-thirds: Add lower-thirds to identify the participants by name and title.
Shooting a three-person interview requires effective coordination, communication, and attention to detail.
Planning ahead and ensuring everyone knows their roles will help you capture an engaging and well-structured conversation.
More for Filmmakers
- Low Budget Filmmaking: More for Less
- Lighting Department Film Roles
- Shooting An Interview
- Documentary Editing
- What is Sound Design in Film?
- Color Grading for Documentary Series or Film
- Film Set Etiquette: Professional Behaviour on Set
- Observational Documentaries And Their Impact

- Essential Skills for Film Industry Professionals
- How to Create a Storyboard in 6 Simple Steps
- What Makes a Film Successful
- Breaking into the Film Industry without Experience
- Sports Documentary Filmmaking

- How to Create a Storyboard Using Sticky Notes
- Remove Background Noise From Video
- Why Do Filmmakers Use Clapper Boards?
- Indie Films
- Indie Filmmaking